ModeSecurity คือ Software
Open Source ตัวหนึ่งที่ทำหน้าที่ ในการ Detection และ Prevention Engine สำหรับ
เว็บไซต์ของเราที่อยู่ฝั่ง Server ที่มีประสิทธิภาพในการป้องกันการโจมตี
ซึ่งเป็นส่วนหนึ่งของโมดูล Apache
2. ให้ทำการ Update และ Upgrade Server ให้มีความเป็นปัจจุบันก่อน
- การ Update จะใช้คำสั่ง $ sudo apt-get update จากนั้นใส่รหัสผ่านลงไป
- การ Upgrade จะใช้คำสั่ง $ sudo apt-get upgrade จากนั้นใส่รหัสผ่านลงไป
ผลจากการ
Update Upgrade เสร็จ
3. Server ต้องมีแพ็คเกตดังต่อไปนี้อยู่ในเครื่องก่อนการติดตั้ง
Mod-Security2
libxml2-dev
liblua5.1-0 lua5.1 apache2-dev build-essential
ถ้าหากยังไม่มี
สามารถทำการติดตั้งได้
โดยการใช้คำสั่งดังต่อไปนี้ $ sudo apt-get install libxml2-dev liblua5.1-0 lua5.1
apache2-dev build-essential ดังรูป
การติดตั้งเสร็จสิ้น
4. ทำการ Download Mod-Security2 มาไว้ในเครื่องก่อน ซึ่งในที่นี้จะเก็บไว้ที่ Desktop
โดยใช้คำสั่งดังต่อไปนี้
$ cd
Desktop/
$
wget http://www.modsecurity.org/download/modsecurity-apache_2.5.11.tar.gz ดังรูป
การ Download เสร็จสิ้น
5. ทำการแตกไฟล์ โดยใช้คำสั่งดังต่อไปนี้ $ tar xvfz modsecurity-apache_2.5.11.tar.gz ดังรูป
6. เข้าไปที่ Directory modsecurity-apache_2.5.11/apache2 โดยใช้คำสั่งดังต่อไปนี้
$ cd
modsecurity-apache_2.5.11/apache2/ ดังรูป
7. ยกสิทธิ์ขึ้นเป็น
root และทำการ Build Mod-Security โดยใช้คำสั่งดังต่อไปนี้
$
sudo su
#
./configure && make && make install ดังรูป
การ Build เสร็จสิ้น
8. ทำการสร้างไฟล์ชื่อ
mod-security2.load เก็บไว้ที่ /etc/apache2/mods-available/ โดยใช้คำสั่งดังต่อไปนี้
# gedit /etc/apache2/mods-available/mod-security2.load ดังรูป
# gedit /etc/apache2/mods-available/mod-security2.load ดังรูป
9. ใส่ข้อความต่อไปนี้ลงไป
LoadFile /usr/lib/libxml2.so
LoadFile
/usr/lib/i386-linux-gnu/liblua5.1.so.0
10. ทำการ Enable
module mod-Security2 และ unique_id โดยใช้คำสั่งดังต่อไปนี้
# a2enmod mod-security2
# a2enmod unique_id ดังรูป
11. สร้างไฟล์คอนฟิกชื่อว่า
mod-security2.conf เก็บไว้ที่ /etc/apache2/conf.d/ โดยใช้คำสั่งดังต่อไปนี้
# cd /
# gedit /etc/apache2/conf.d/mod-security2.conf จากนั้นพิมพ์สิ่งต่อไปนี้ลงไป
# gedit /etc/apache2/conf.d/mod-security2.conf จากนั้นพิมพ์สิ่งต่อไปนี้ลงไป
Include
/etc/modsecurity2/*.conf แล้วก็ Save
ไว้ ดังรูป
12. ทำการสร้าง Directory และไฟล์ที่จำเป็นของระบบ
โดยใช้คำสั่งดังต่อไปนี้
# mkdir
/etc/modsecurity2
# mkdir /etc/modsecurity2/logs
# touch /etc/modsecurity2/logs/modsec_audit.log
# touch /etc/modsecurity2/logs/modsec_debug.log ดังรูป
# mkdir /etc/modsecurity2/logs
# touch /etc/modsecurity2/logs/modsec_audit.log
# touch /etc/modsecurity2/logs/modsec_debug.log ดังรูป
13. ทำการ Copy Rule ทั้งหมดจาก /home/redcrow/Desktop/modsecurity-apache_2.5.11/rules/ ไปไว้ใน /etc/modsecurity2
โดยใช้คำสั่งดังต่อไปนี้
# cp
/home/redcrow/Desktop/modsecurity-apache_2.5.11/rules/*.conf /etc/modsecurity2 ดังรูป
14. ทำการแก้ไข Path สำหรับเก็บ
Log File ให้ตรงตามที่ได้สร้างไว้ในข้อ 12 โดยการใช้คำสั่งดังต่อไปนี้
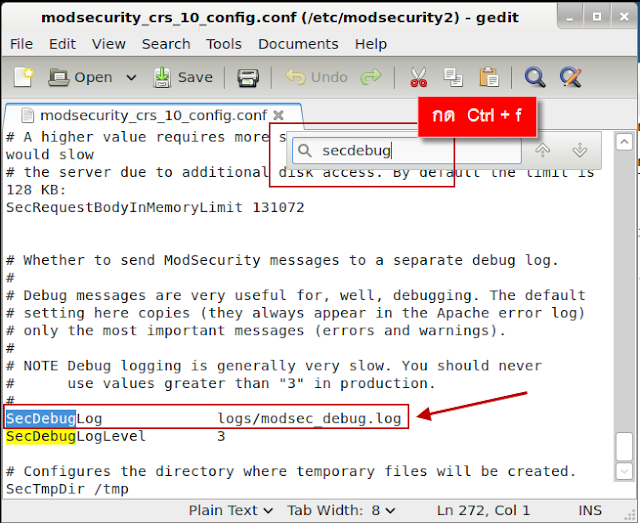
# gedit /etc/modsecurity2/modsecurity_crs_10_config.conf ดังรูป


# gedit /etc/modsecurity2/modsecurity_crs_10_config.conf ดังรูป


15. โดย
:
ค้นหา SecDebugLog logs/modsec_debug.log
แทนที่ด้วย SecDebugLog /etc/modsecurity2/logs/modsec_debug.log
ค้นหา SecAuditLog logs/modsec_audit.log
แทนที่ด้วย SecAuditLog /etc/modsecurity2/logs/modsec_audit.log
จากนั้นก็ Save ไว้ ดังรูป
ค้นหา SecDebugLog logs/modsec_debug.log
แทนที่ด้วย SecDebugLog /etc/modsecurity2/logs/modsec_debug.log
ค้นหา SecAuditLog logs/modsec_audit.log
แทนที่ด้วย SecAuditLog /etc/modsecurity2/logs/modsec_audit.log
จากนั้นก็ Save ไว้ ดังรูป
แก้ไขใหม่
และ
แก้ไขใหม่
16. ทำการตรวจสอบค่า
Config ของ apache ซึ่งถ้าไม่มีปัญหาอะไร
จะคืนมาเป็น Syntax OK
โดยใช้คำสั่งดังต่อไปนี้ # apache2ctl
configtest ดังรูป
17. ทำการ Restart Service Apache โดยการใช้คำสั่งดังต่อไปนี้ # service apache2 restart ดังรูป
18. การตรวจสอบการทำงานของ
mode-security2 ทำได้โดยใช้คำสั่งดังต่อไปนี้
# cat /var/log/apache2/error.log | grep ModSecurity ดังรูป


ไม่มีความคิดเห็น:
แสดงความคิดเห็น