1. เปิด Terminal ขึ้นมาด้วยการกด Ctrl + Alt + t ดังรูป
$ cd
/
$
sudo mkdir ssl-cert
3. ติดตั้งโปรแกรม openssl โดยใช้คำสั่ง
$ sudo apt-get install openssl ดังรูป
การติดตั้งเสร็จสมบูรณ์
4. แก้ไขไฟล์ openssl.cnf ซึ่งเก็บไว้ใน /etc/ssl โดยการใช้คำสั่งดังต่อไปนี้
State0rProvinceName_default
= //ค่าว่าง
จากนั้น Save ไว้เหมือนเดิม ดังรูป
6. สร้างไฟล์ Certificate โดยใช้คำสั่งดังต่อไปนี้ $ sudo openssl
genrsa –out server.key 1024 ดังรูป
7. สร้าง Certificate
Signing Request (CSP) โดยการใช้คำสั่งดังต่อไปนี้
$ sudo openssl req -config
/etc/ssl/openssl.cnf -new -key server.key -out newcsr.csr ดังรูป
หมายเหตุ สัญลักษณ์
“\” หมายถึงการขึ้นบรรทัดใหม่
เพื่อให้สามารถอ่านคำสั่งได้ง่ายขึ้น
8. จากนั้นกรอกข้อมูลดังรูปต่อไปนี้
9. สร้างไฟล์ Server
Certificate โดยการใช้คำสั่งดังต่อไปนี้
$ sudo openssl x509 -req -days 365 -in newcsr.csr -signkey
server.key -out server.crt
ดังรูป
10. กำหนดให้ Apache Web Server ใช้งาน SSL โดยใช้คำสั่งดังต่อไปนี้ $ sudo a2enmod ssl ดังรูป
11. สร้าง
/etc/apache2/sites-available/sslsite โดยใช้คำสั่งดังต่อไปนี้
$ sudo cp
/etc/apache2/sites-available/default /etc/apache2/sites-available/sslsite ดังรูป
12. ทำการแก้ไขไฟล์ /etc/apache2/sites-available/sslsite โดยการใช้คำสั่งดังต่อไปนี้
$ sudo gedit /etc/apache2/sites-available/sslsite ดังรูป
13. แก้ข้อความตามนี้
NameVirtualHost *:443
<VirtualHost *:443>
ServerAdmin admin@
na5cent.com
SSLEngine On
SSLCipherSuite
ALL:!ADH:!EXPORT56:RC4+RSA:+HIGH:+MEDIUM:+LOW:+SSLv2:+EXP:+eNULL
SSLCertificateFile
/ssl-cert/server.crt
SSLCertificateKeyFile
/ssl-cert/server.key
จากนั้น
Save ไว้ ดังรูป
14. กำหนดให้คอนฟิกนั้น enable โดยใช้คำสั่งดังต่อไปนี้ $ sudo
a2eansite sslsite ดังรูป
15. Restart
Network และ Apache โดยใช้คำสั่งดังต่อไปนี้
$ sudo /etc/init.d/networking restart
$ sudo service apache2 restart
ดังรูป
16. ตรวจสอบการทำงานของ
SSL ซึ่งจะทำงานอยู่ที่พอร์ต
443
โดยใช้คำสั่งดังต่อไปนี้ $ netstat –tan ดังรูป
17. ตรวจสอบ
IP เครื่อง Server โดยใช้คำสั่งดังต่อไปนี้ $ sudo ifconfig ดังรูป
18. ทดสอบการใช้บริการ
HTTPS ผ่านเครื่อง Client (Ubuntu Desktop)
ที่เครื่อง
Client เปิด Browser
ขึ้นมา พิมพ์ URL เป็น https://Server_IP เช่น https://192.168.107.144 ดังรูป
19. คลิกที่
I Understand the Risks
> Add Exception > Confirm Security Exception ดังรูป
20. สามารถใช้บริการ
HTTPS ได้ดังรูป
21. ลองพิมพ์
URL https://192.168.107.144/index.php ดังรูป
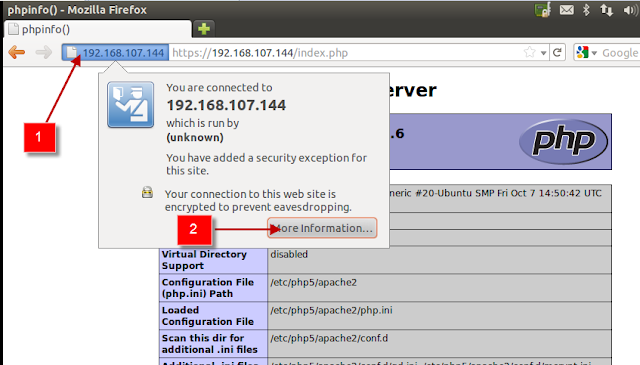
22. ดูรายละเอียดของ
Server Certificate ดังรูป


ไม่มีความคิดเห็น:
แสดงความคิดเห็น